With our return from NY, it was time to get down to some of the periodic maintenance we had let go during our extended stay on the hard. Now that we are back in the water and the weather is starting to warm up, we thought it would be nice to have our dinghy at our disposal. When we first moved down here, we had kept up with making sure to start our outboard engine at least once a month to be sure that the carburetor wouldn't get gummed up from stale gas. (Gasoline degrades to shellac when left unused.) A carburetor is a device that blends air and fuel for an internal combustion engine and if its not working correctly you're dead in the water. When we got on the hard, that motivation faded fast, and the maintenance got put on the back burner. Bad idea! Frank has spent the past couple of days trying to get our outboard started and running correctly. Before this, he has had very limited (i.e. zero) experience with small gas engines. At this point, he has disassembled, cleaned, and re-assembled the carburetor and fuel lines at least 4 times, re-gapped the spark plugs, and checked the impeller nearly as many times as well. It turned out that aside from the initial dirty carburetor, a simple 10-cent O-ring in the carb was causing the engine to run poorly.
As far as we understand, carburetors tend to be the main culprit when an outboard either refuses to run or runs poorly. Frank was a bit apprehensive when he started taking apart the carburetor for the first time without any instructions, so he made it a point to chronicle his experience in case anyone else out there is in the same predicament. Our outboard is a 4 stroke Nissan 9.8 and should be the same as the 8hp Nissan as well as the 8 and 9.8 Tohatsu, though I'm sure this is relevant to a lot of other small outboard carburetors as well.
The first step is remove the carburetor from the engine. To do that, first, you need to remove the throttle linkage from the carburetor body by loosening the set screw and sliding the connecting rod out.
 |
| Set screw for throttle connecting rod |
Be careful not to lose the rod as there is nothing holding it in place on its other end.
 |
| Throttle connecting rod back end that easily falls off |
Next, the choke connecting rod must be removed. The small white plastic retaining clip rotates down freeing the rod.
 |
| Choke linkage |
Remove the hose connected to the top of the air box from the engine side.
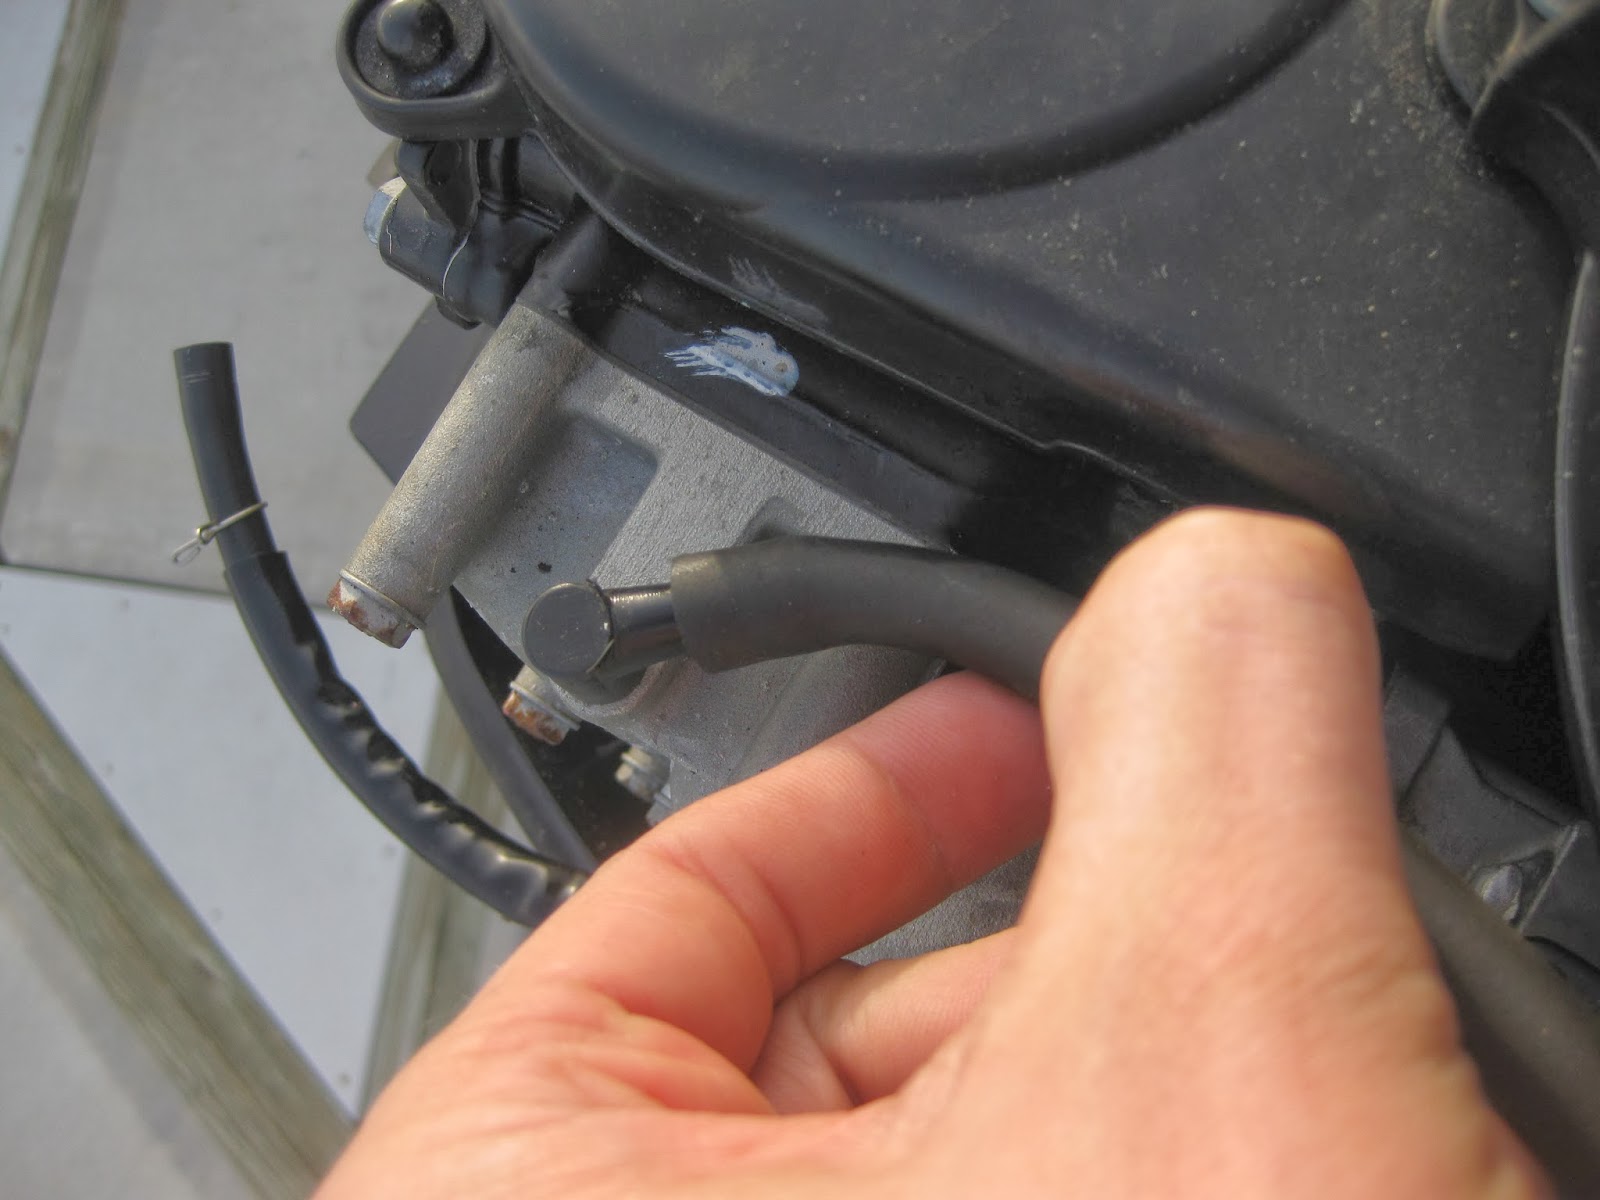 |
| Air box hose |
The fuel line must also be removed from the back side of the engine. Some gas will most likely spill out as the line is removed, so have some paper towels handy.
 |
| Fule line |
Now that its all freed up, its time to remove the carburetor (as well as the air box as it comes off with the carb) from the engine. Loosen the 2 10mm bolts and the whole shebang should easily pull off.
 |
| One of the two 10mm screws attaching the carb/air box to the engine |
At this point it's time to take the carburetor to a CLEAN work surface to continue disassembling it. On the bottom of the carb bowl there are 4 phillips screws that need to be removed. Once off place the screws in a small dish so that they don't get lost, and separate the bowl from the carburetor body. There will most likely still be some gas left inside, so its best to do this over a disposable plate to avoid making a mess.
 |
| Screws attaching the bowl to the body |
Inside the float is visible, and can be removed by loosing the phillips retaining screw.
 |
| Removing the retaining screw that holds the float in place |
Once freed up gently lift the float body straight up; careful not to lose the needle in the process. Remove the needle as well as the hinge pin form the float and place them in a small container of carb cleaner (a shot glass works well for this).
 |
| Floate with the needle and roller pin still attached |
Now with a flat head screwdriver remove the two brass screws that are visible.
 |
| Larger of the two brass screws |
They are easily stripped so be careful. Once removed, place the screws into your small container of carb cleaner along with the needle and pin.
 |
| Removing the smaller screw that hides the jet |
Under the smaller of the two screws lies the jet. You will need a small flathead to get down in there and unscrew it.
 |
| The jet is visible in the lower hole |
The jet is one of the most prone places on the carburetor to become clogged by small debris because of the tiny passages it contains. A specialty carburetor jet cleaning tool is available, however, a piece of mono-filament fishing line will work if your cheap like me. The idea is to clear out any debris or gummed up gas from the tiny hole down the center of the jet. A soak in the carburetor cleaner will help loosen all the nasty stuff up.
 |
| Jet |
Next, flip the carburetor over and remove the SS plate from its top. At this point the carb is as disassembled as it needs to be for the average cleaning. Take the body outside along with the bowl that you removed earlier and blast it all with the carburetor cleaner. Make sure to pay special attention to all of the small holes and passages through out the body, and use a liberal amount of cleaner (this is no place to skimp).
 |
| SS plate on top of carb |
When your sure that the carb body, bowl, jet, needle, pin, and brass screws are absolutely positively squeaky clean, you can begin to re-assemble everything. This is a good time to check the gaskets and o-rings that you removed and replace any damaged ones. When you have everything back together and mounted back on the engine the last thing you have to pay attention to is the adjustment on the throttle linkage. With the throttle set to full on the handle, the throttle on the carburetor should hit its stop. If it doesn't just loosen up the set screw and re-adjust until you have it right.
 |
| Throttle hitting its stop on the carb body when the handle is set to full throttle |


