We finally bit the bullet and hauled Moitessier out of the water. We have been dreading this moment for some time now, holding off and creating new projects for ourselves just to avoid this inevitability. To be honest, we were both incredibly apprehensive about it for our fears of not getting her back in the water. Fear of being inundated with all the projects that being hauled out involved, fear of once again biting off more than we could chew, and simply fear of the unknown (Yes, our last boat traumatized us a little....). Not only that, but living on the hard also means no refrigeration (water cooled), AC (also water cooled), and no head thus having to climb up and down a 12 ft ladder just to go to the bathroom. Not fun at all, but we figured we had better just stop moaning and being cowards about it, because that's not going to get us anywhere.

The first major project on our long list is repowering. Yes, I just said those dreaded words....repowering! Every boat owner's worst nightmare (well, at least mine.) This is a very expensive and labor intensive project that we had no intention on undertaking until about 2 months ago after making a deal at the Miami Boat Show with Yanmar. Up until the show, we hadn't fully decided on what to do with our old Mercedes Nanni Engine. Though the Mercedes side had passed the compression tests with flying colors, we were having serious trouble finding parts for the marinized Nanni portion of the engine. After months of unsuccessfully trying to go through Nanni to get parts for our heat exchanger, we found that in order to get the marinized side of the engine up to shape, we would have to custom make a lot of the parts, as Nanni discontinued most of the pieces we had needed and no one else made parts for the Mercedes block. Long story short, this would've meant thousands of dollars poured into a 30 year old engine, something that just didn't make sense to us. Anyhow, with the huge discount that we were able to finagle at the show, we opted for a 75 hp Yanmar. Everyone has their own beast of choice, but we chose Yanmar mainly for the parts availability/popularity. It's comforting to know no matter which anchorage we pull into in the world, we will not have problems finding spares (for at least another 10 years ;)
 |
| Our new 75 hp 4JH4-TE in its crate |
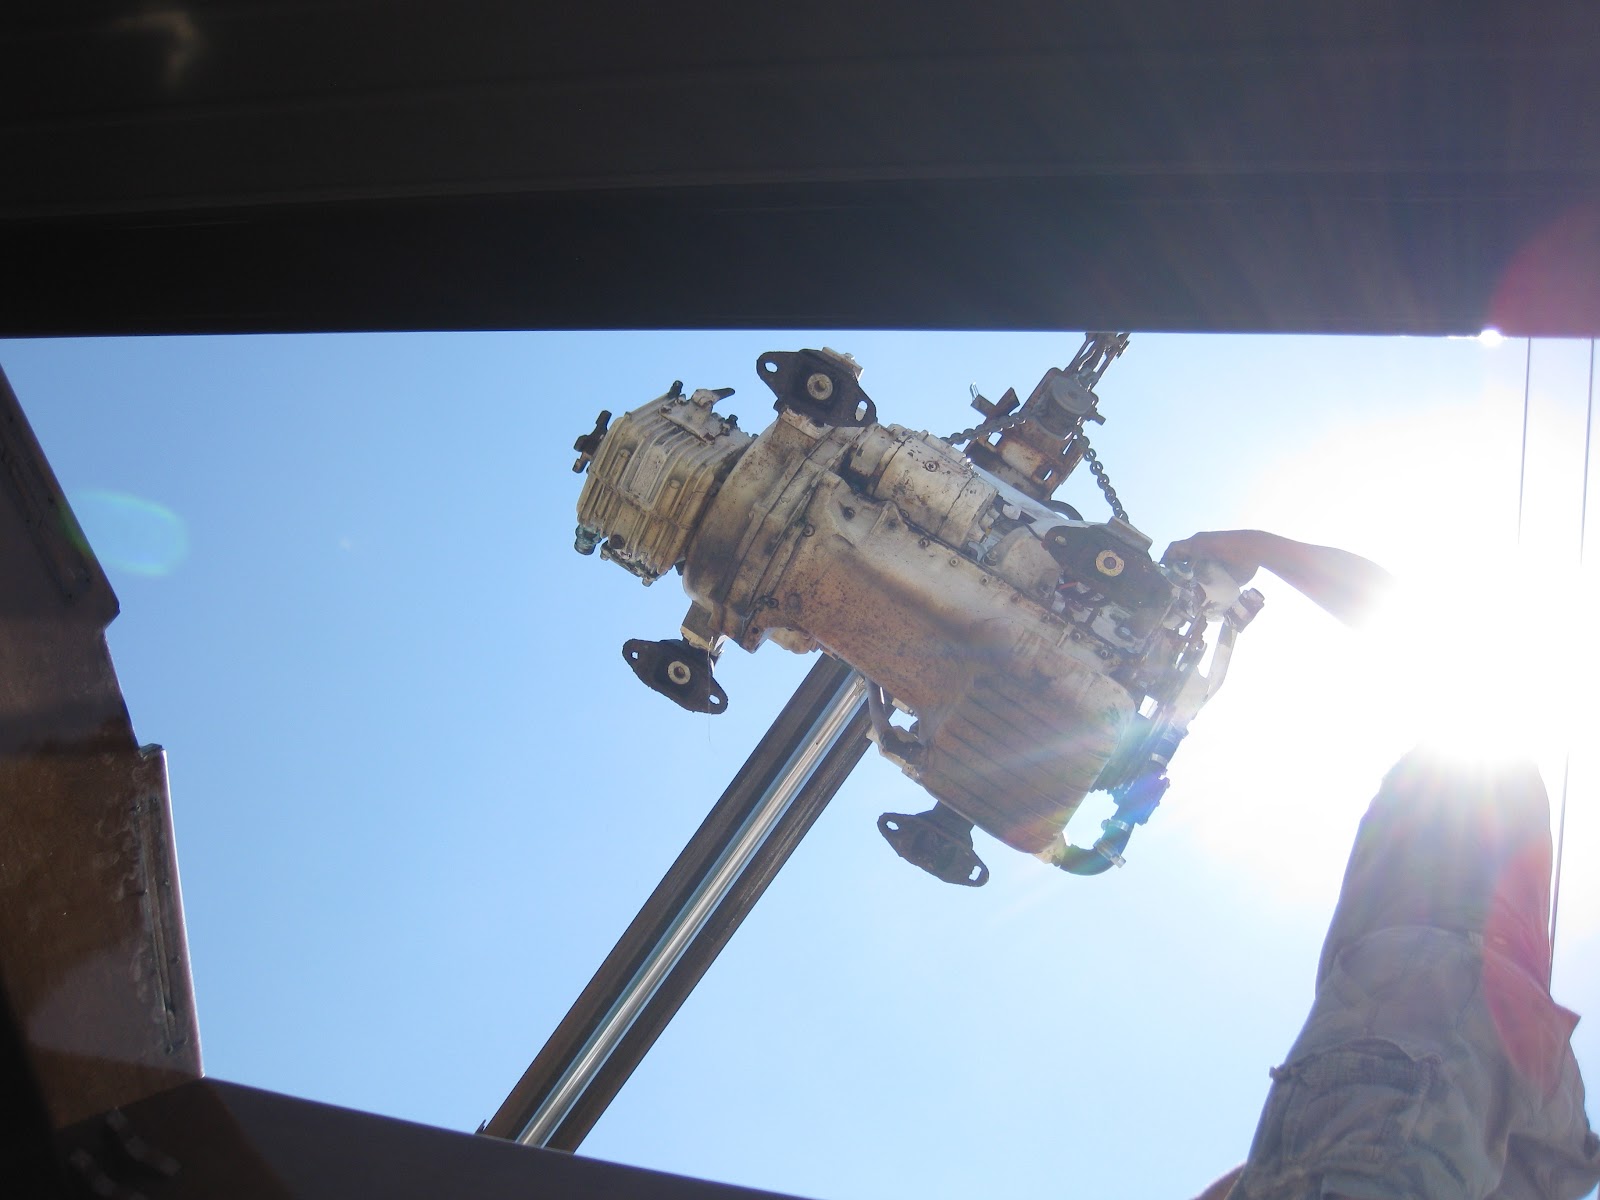
Hauling the boat out was....an experience. We had already started disconnecting the engine, preparing for it to be pulled as soon we were on the hard, therefore, getting to slings required a tow. This was complicated by the fact that we had to pull in stern first so that our stays could clear the travel lift. It was a white knuckled ordeal, but thanks to the amazing yard help, it went smoother than it could have. Since we had already removed the heat exchanger, hoses, wiring, and alternator before haul out yanking the engine from the boat merely involved removing the shaft coupler, unscrewing it from the mounts, and lifting it out through the butterfly hatches. This went out pretty easily with the help of the yard's boom truck.
 |
| Hatches removed |
 |
| Out she goes |
 |
| Up up and away! |
Then it was on to the big cleanup. Since access to anything underneath the engine or in the bilges would be nonexistent once the new Yanmar goes in, we decided to address everything and anything that was in there. Frank started with a thorough cleaning of the bilges, followed by organizing the wires, removing any obsolete wire, and creating well secured runs. In the process, we discovered that our fresh water hoses were shot (cracked, delaminated, and chafed!). And so Pandora's box is opened. We decided that it was time to re-plumb and opted for PEX hoses with copper crimped connections. This job was pretty straight forward, in the end, only 2 of the roughly 80 fittings had leaks, and those were the threaded connections (not the crimped ones). Pretty good for Frank, as he is notoriously bad at plumbing. A few turns on the leaky fittings remedied them and the new hoses are a big improvement over their predecessors. All in all, a 2 day project that cost around $200...not too bad.


 |
| PEX water lines |
After painting the bilges with grey Bilgekote, we are now removing and replacing 3 thru-hulls and seacocks in the engine room. One of these will be turned into a keel cooler (for our future Frigoboat refrigeration unit), another will be replaced with a new Groco seacock for the engine intake, and the third will be glassed over (as we are selling our 6KW Kohler gen-set). In the process of all of this, we discovered that one of our water tanks (the 25 gallon one sitting under our engine) was merely held in place by the fill hose. A little shocking as when it's full, it weighs about 200 lbs. How it never broke free before is a mystery/miracle to us. Frank is addressing this issue by welding stainless steel "L" brackets, fiberglassing them to the tanks, and bolting them to the wooden stringers in the bilge.
It's been about a week and half and it seems like we've been on the hard for a month. Crazy how living up a 12 ft ladder, in humid 80 degree Florida weather, with a dorm room fridge can be so motivating! We hope to have the new engine dropped in place by next week, but who knows as we are at the mercy of Fedex and UPS for the shipment of all of the new parts we need.